Admin UI
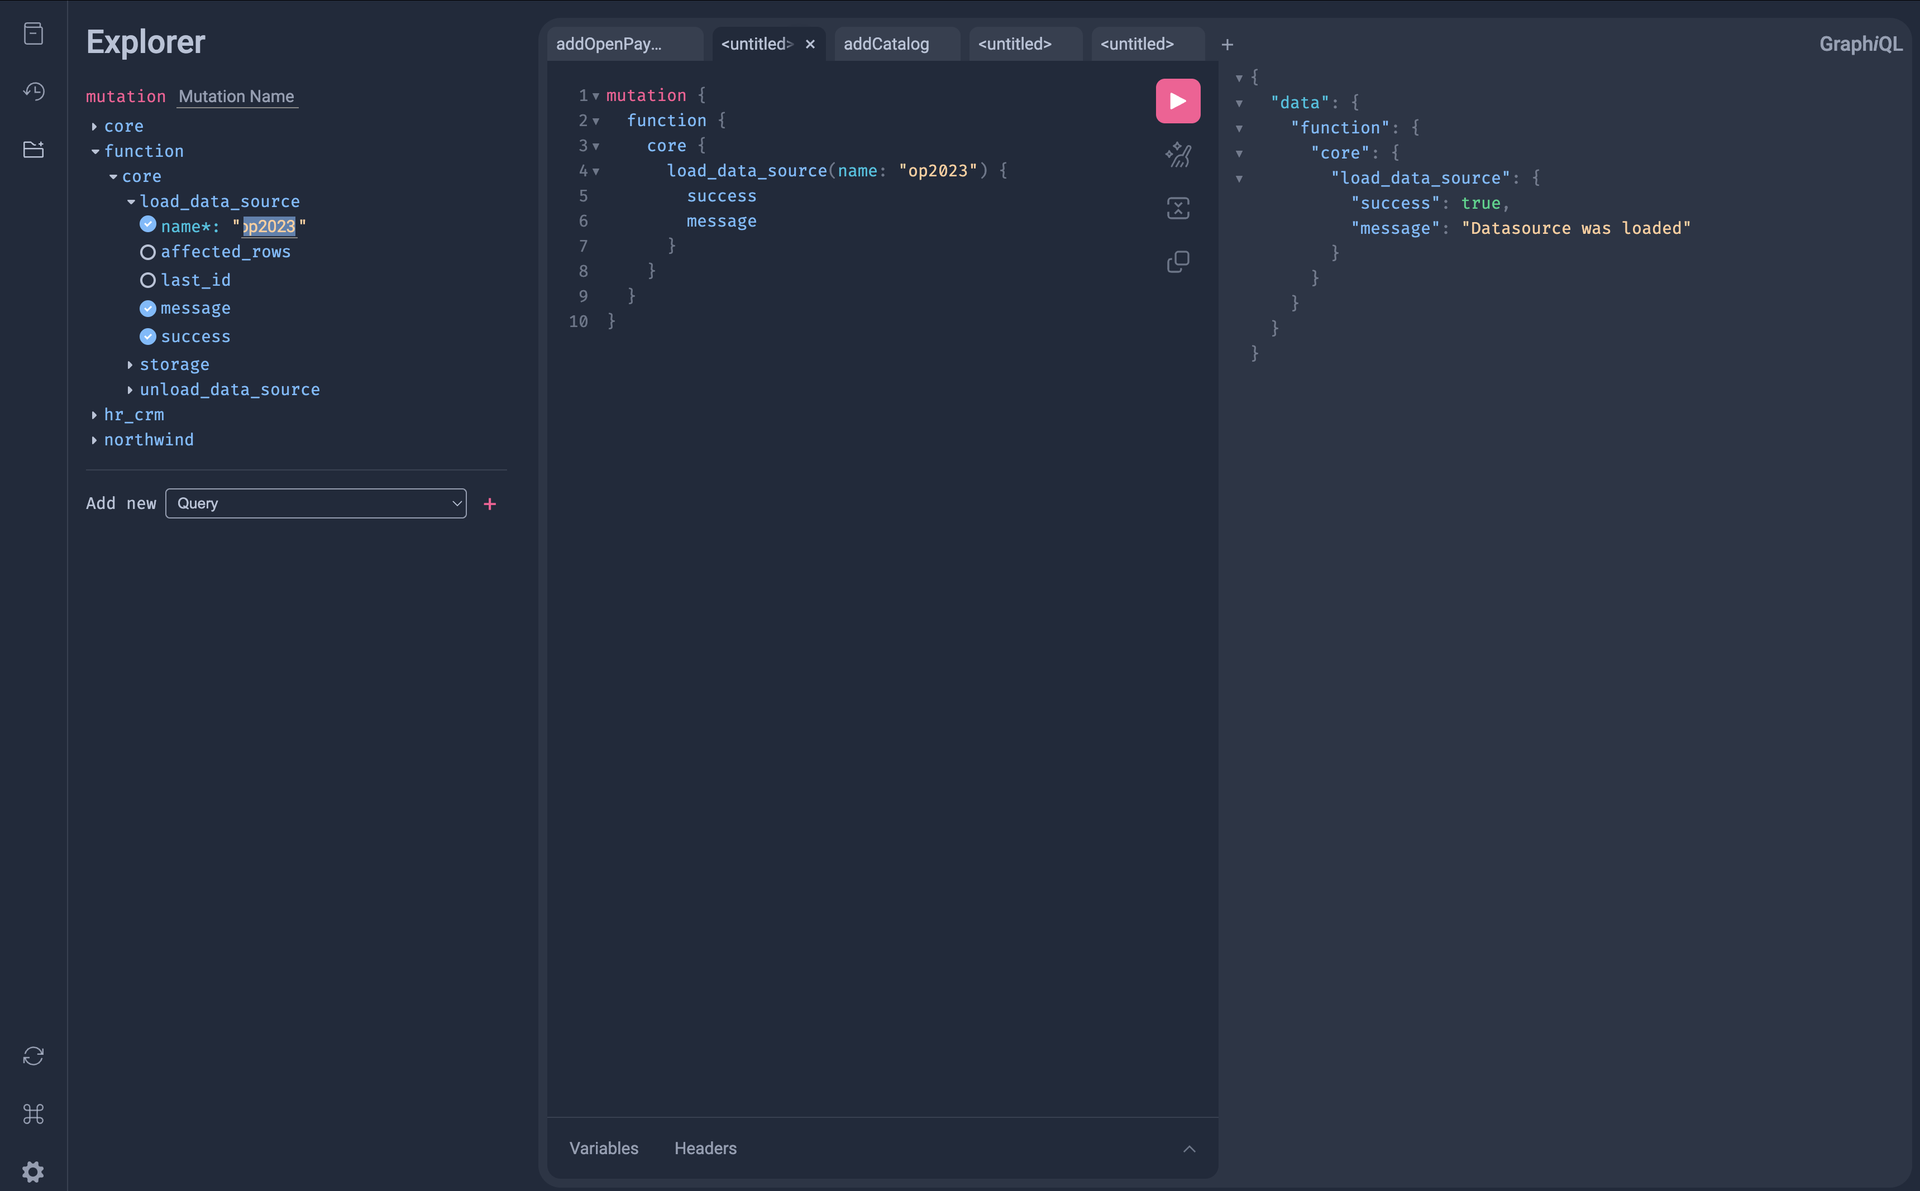
The Admin UI is a built-in GraphiQL-based interface for interactive GraphQL exploration, testing, and debugging. It provides a powerful web-based IDE for working with the hugr GraphQL API.
Overview
The Admin UI provides:
- GraphiQL Interface: Industry-standard GraphQL IDE with syntax highlighting and autocomplete
- Explorer Plugin: Visual query builder for discovering and composing queries
- Schema Documentation: Interactive schema browser with type information
- Query History: Access to previously executed queries
- Authentication Integration: Seamless integration with hugr's authentication system
- Role-Based Schema: Schema visibility respects user permissions
- Embeddable: Can be embedded in external applications via iframe
Accessing Admin UI
Path: /admin
URL: http://your-hugr-server:8080/admin
Enabling Admin UI
The Admin UI is enabled by default. To control its availability, use the ADMIN_UI environment variable:
# Enable Admin UI (default)
ADMIN_UI=true

# Disable Admin UI
ADMIN_UI=false
When disabled, the /admin endpoint returns a 404 error, but the GraphQL API at /query continues to work normally.
Authentication
The Admin UI respects all authentication rules configured for the hugr instance. Authentication assigns a role which determines what types and fields are accessible based on the role_permissions table.
Anonymous Access
If anonymous access is enabled (ALLOWED_ANONYMOUS=true), the Admin UI will:
- Allow access without authentication
- Show only types and fields visible to the anonymous role based on
role_permissions - Fields with
hidden: trueare not shown in schema introspection (but can be explicitly requested) - Fields with
disabled: trueare completely inaccessible - Display "Public Schema" mode indicator
Example: Enable anonymous access
ALLOWED_ANONYMOUS=true
ANONYMOUS_ROLE=anonymous
Anonymous users will see only the schema permitted by their role permissions.
Authenticated Access
Hugr uses role-based authentication. If no valid authentication token/key/cookie is provided, the API returns 401 Unauthorized. The Admin UI supports multiple authentication methods:
1. Bearer Token (JWT/API Key)
The most common method is to use the Authorization header:
- Obtain a JWT token or API key
- Open the Admin UI at
/admin - Click "Headers" at the bottom
- Add the Authorization header:
{"Authorization": "Bearer your-token-here"}
- Execute queries with authentication
2. Cookie Authentication
For web applications, authentication tokens can be passed via cookies. This is the recommended method for embedding the Admin UI.
Cookie Name: Configured via OIDC_COOKIE_NAME (default: hugr_session)
Setup:
-
Configure cookie name:
OIDC_COOKIE_NAME=hugr_session -
Set the cookie in your application:
document.cookie = `hugr_session=${authToken}; path=/; secure; samesite=strict`; -
Open Admin UI - authentication is automatic
Note: Cookies must be set for the same domain as the hugr server or use appropriate CORS configuration.
Role-Based Schema Visibility
The Admin UI automatically filters the schema based on the user's role using permissions from the role_permissions table:
- Fields with
hidden: false(default): Visible in schema and queries - Fields with
hidden: true: Not shown in introspection, but can be explicitly requested in queries - Fields with
disabled: true: Completely inaccessible
Example permissions:
mutation {
  core {
    # Anonymous users cannot see users type at all
    insert_role_permissions(data: {
      role: "anonymous"
      type_name: "users"
      field_name: "*"
      disabled: true
    }) {
      role
      type_name
    }

    # Viewer role cannot see email field
    insert_role_permissions(data: {
      role: "viewer"
      type_name: "users"
      field_name: "email"
      hidden: true
    }) {
      role
      field_name
    }

    # Password field disabled for all except admin
    insert_role_permissions(data: {
      role: "viewer"
      type_name: "users"
      field_name: "password"
      disabled: true
    }) {
      role
      field_name
    }
  }
}
In the Admin UI:
- Anonymous: Won't see the
userstype at all - Viewer: Will see
usersbutemailhidden from introspection,passwordcompletely blocked - Admin: Typically sees the full schema (no restrictive permissions)
Features
1. Query Editor
The main editor provides:
- Syntax Highlighting: GraphQL syntax highlighting
- Autocomplete: Intelligent code completion (Ctrl+Space)
- Error Detection: Real-time query validation
- Format: Auto-format queries (Ctrl+Shift+F)
- Execute: Run queries (Ctrl+Enter)
2. Explorer Plugin
The Explorer plugin provides a visual query builder:
- Type Browser: Navigate the schema visually
- Field Selection: Click to add fields to the query
- Filter Builder: Add filters, sorting, and pagination
- Relationship Navigation: Explore nested relationships
- One-Click Queries: Generate complete queries with one click
Usage:
- Click the "Explorer" icon in the left sidebar
- Browse types in the explorer panel
- Check fields to add them to the query
- Click "Play" to execute
3. Documentation Explorer
The Docs panel provides:
- Schema Browser: Browse all types, fields, and operations
- Type Information: View field types, descriptions, and deprecations
- Search: Search types and fields by name
- Examples: See usage examples for queries and mutations
Usage:
- Click "Docs" in the top-right
- Click on types to view details
- Click on fields to see arguments and return types
4. Query History
Access previously executed queries:
- Persistent History: Queries are saved in browser localStorage
- Quick Access: Rerun previous queries with one click
- Search History: Find queries by content
Usage:
- Click the "History" icon
- Browse previous queries
- Click a query to load it in the editor
5. Variables Panel
Define query variables separately from the query:
- JSON Editor: Edit variables in JSON format
- Validation: Real-time JSON validation
- Type Checking: Variables are validated against query signature
Usage:
- Click "Variables" at the bottom
- Enter variables in JSON format:
{"userId": 123,"limit": 10}
- Reference in query:
query GetUser($userId: Int!)
6. Headers Panel
Add custom HTTP headers:
- Authorization: Bearer tokens, API keys
- Custom Headers: Any additional headers
Usage:
- Click "Headers" at the bottom
- Enter headers in JSON format:
{"Authorization": "Bearer your-token","X-Custom-Header": "value"}
7. Response Viewer
View query results:
- JSON Viewer: Formatted JSON response with collapsible sections
- Error Display: Clear error messages with locations
- Extensions: View extensions data (e.g., JQ transformations)
- Copy to Clipboard: Copy response JSON
Embedding Admin UI
The Admin UI can be embedded in external applications using iframes. This is useful for:
- Building custom admin panels
- Integrating with existing applications
- Creating developer portals
- Adding GraphQL capabilities to dashboards
CORS Configuration
To embed the Admin UI in an iframe, configure CORS:
# Allow specific origins
CORS_ALLOWED_ORIGINS=http://localhost:3000,https://app.example.com

# Allow all headers (required for iframe)
CORS_ALLOWED_HEADERS=Content-Type,Authorization,*

# Allow all methods
CORS_ALLOWED_METHODS=GET,POST,PUT,DELETE,OPTIONS
See Configuration - CORS Settings for more details.
Embedding Example
HTML:
<!DOCTYPE html>
<html>
<head>
  <title>My Admin Panel</title>
  <style>
    #graphiql-frame {
      width: 100%;
      height: 100vh;
      border: none;
    }
  </style>
</head>
<body>
  <iframe
    id="graphiql-frame"
    src="http://localhost:8080/admin"
    allow="clipboard-write"
  ></iframe>
</body>
</html>
Authentication for Embedded UI
When embedding the Admin UI, use cookie-based authentication for seamless integration:
Setup Cookie Authentication
-
Configure cookie name:
OIDC_COOKIE_NAME=hugr_session -
Set the cookie in your application:
// After user authenticates in your appconst authToken = 'user-jwt-token';// Set cookie for hugr domaindocument.cookie = `hugr_session=${authToken}; path=/; domain=.example.com; secure; samesite=none`; -
Embed the Admin UI:
<iframe src="https://hugr.example.com/admin"></iframe>
The Admin UI will automatically read the authentication token from the cookie.
Cross-Domain Authentication
For cross-domain embedding, ensure:
-
CORS is configured to allow the parent domain:
CORS_ALLOWED_ORIGINS=https://app.example.com -
Cookie is set with SameSite=None and Secure:
document.cookie = `hugr_session=${token}; path=/; secure; samesite=none`; -
Both domains use HTTPS (required for SameSite=None)
Example: React Integration
import React, { useEffect, useRef } from 'react';

function GraphQLExplorer({ authToken }) {
  const iframeRef = useRef(null);

  useEffect(() => {
    // Set authentication cookie
    document.cookie = `hugr_session=${authToken}; path=/; secure; samesite=none`;
  }, [authToken]);

  return (
    <iframe
      ref={iframeRef}
      src="https://hugr.example.com/admin"
      style={{ width: '100%', height: '100vh', border: 'none' }}
      allow="clipboard-write"
    />
  );
}

export default GraphQLExplorer;
Security Considerations for Embedding
-
Validate Origins: Always specify exact origins in CORS configuration
# Good: Specific originsCORS_ALLOWED_ORIGINS=https://app.example.com,https://dashboard.example.com# Avoid: Wildcard in productionCORS_ALLOWED_ORIGINS=* -
Use HTTPS: Always use HTTPS for production deployments
-
Secure Cookies: Set
SecureandHttpOnlyflags on cookies -
Content Security Policy: Configure CSP headers in the parent application:
<meta http-equiv="Content-Security-Policy"content="frame-src https://hugr.example.com;"> -
Token Expiration: Implement token refresh for long-lived sessions
Common Use Cases
1. API Exploration
Use the Admin UI to explore the API schema:
- Open
/adminwithout authentication (if anonymous access is enabled) - Click "Docs" to browse available types
- Use Explorer to build queries visually
- Test queries and see results
2. Development and Testing
During development:
- Open Admin UI in a separate tab
- Test queries as you build your application
- Copy working queries to your code
- Debug issues with real-time feedback
3. Documentation for Teams
Share the Admin UI with team members:
- Enable anonymous access for public types
- Share the
/adminURL - Team members can explore the schema
- Non-technical users can use Explorer to build queries
4. Customer/Partner Portal
Embed Admin UI in customer-facing applications:
- Configure CORS for your domain
- Embed Admin UI in iframe
- Use cookie authentication for seamless experience
- Customers can explore data they have access to
5. Debugging Production Issues
Use Admin UI to investigate issues:
- Authenticate with appropriate credentials
- Execute queries to reproduce issues
- Check error messages and response data
- Test fixes in real-time
Limitations
1. Mutations Require Confirmation
When executing mutations (insert, update, delete), the Admin UI:
- Shows a warning before execution
- Requires explicit confirmation
- Displays affected rows after execution
This prevents accidental data modifications.
2. Query Complexity Limits
The Admin UI respects the same query complexity limits as the API:
- Maximum query depth (default: 7)
- Maximum concurrent queries
- Timeout limits
3. No File Upload
The current Admin UI does not support file uploads. Use the GraphQL API directly for file operations.
4. Browser Storage
Query history and preferences are stored in browser localStorage:
- Limited storage space (~5-10 MB)
- Cleared when browser data is cleared
- Not synchronized across devices
Customization
The Admin UI is built using GraphiQL 4.0.0 with the Explorer plugin. It connects to the GraphQL endpoint at /query and includes:
- React 19.1.0
- GraphiQL with syntax highlighting and autocomplete
- Explorer plugin for visual query building
- Query history and variables support
The interface is served from CDN (esm.sh) and loads automatically when accessing /admin.
Troubleshooting
Admin UI Not Loading
Issue: /admin returns 404
Solutions:
- Check
ADMIN_UI=trueis set - Restart hugr server after changing configuration
- Verify the URL:
http://your-server:8080/admin(not/graphqlor/query)
Authentication Not Working
Issue: Queries fail with "Unauthorized" error
Solutions:
- Check token is valid and not expired
- Verify Authorization header format:
Bearer <token> - For cookie auth, check cookie name matches
OIDC_COOKIE_NAME - Test with anonymous access (if enabled) to isolate auth issues
Schema Not Visible
Issue: Types or fields are missing
Solutions:
- Check user role: Anonymous users see limited schema based on permissions
- Review
role_permissionstable forhiddenanddisabledflags - Authenticate with a token/key to access more fields
- Use introspection to verify schema:
{ __schema { types { name } } }
Embedded UI Not Loading
Issue: iframe shows blank page or CORS error
Solutions:
- Configure CORS to allow parent domain:
CORS_ALLOWED_ORIGINS=https://your-app.com
- Check browser console for specific errors
- Verify both parent and hugr use HTTPS (for SameSite=None cookies)
- Check iframe
srcURL is correct
Cookie Authentication Not Working
Issue: Admin UI doesn't recognize authentication cookie
Solutions:
- Verify cookie name matches
OIDC_COOKIE_NAMEconfiguration - Check cookie is set for the correct domain
- For cross-domain, ensure:
SameSite=NoneandSecureflags are set- Both domains use HTTPS
- Check cookie is not expired
- Inspect cookies in browser DevTools
Mutations Not Working
Issue: Mutations fail or don't execute
Solutions:
- Check user has permission for mutations
- Verify mutation syntax is correct
- Confirm required fields are provided
- Check for validation errors in response
- Test with GraphQL API directly to isolate UI issues
Best Practices
1. Disable in Production API Servers
For production API servers, consider disabling the Admin UI:
ADMIN_UI=false
Use a separate Admin UI instance or embed it in your admin application.
2. Use Role-Based Access
Configure schema visibility based on roles using the role_permissions table:
- Public data: No restrictive permissions (accessible by default)
- Internal data: Set
disabled: truefor anonymous role - Sensitive data: Set
disabled: truefor all non-admin roles, orhidden: trueto hide from introspection
3. Implement Session Timeouts
For security, implement session timeouts:
- Use short-lived JWT tokens
- Implement token refresh
- Clear cookies on logout
4. Monitor Usage
Track Admin UI usage for security auditing:
- Log authentication events
- Monitor mutation operations
- Alert on suspicious activity
5. Provide Example Queries
Add example queries to help users:
- Use query comments to explain usage
- Provide example variables
- Document common use cases
6. Keep Dependencies Updated
The Admin UI uses CDN-hosted libraries (GraphiQL, React). While this ensures the latest version, you may want to:
- Monitor for breaking changes
- Pin specific versions if stability is critical
- Test after GraphiQL updates
See Also
Documentation
- GraphQL API - Main GraphQL API documentation
- Authentication Setup - Configure authentication methods
- Access Control - Role-based permissions
- Configuration - Server configuration options
- CORS Settings - CORS configuration for embedding